
Subtotal: ₹687 (incl. VAT)

Critical Care
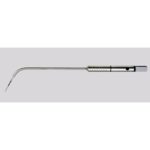
ALLA-France Folding Screen Digital Oven Thermometer
Availability:
Out of stock
Features:-
0+300?C / +32+572?F
Display: 0.1?
Accuracy: ?1?C (0+150?C) / ?2?F(+32+302?F) otherwise ?3?C/?5?F
IP67 stainless steel probe: 150 mm -?4 mm
Waterproof Stainless steel cable: 100 cm
Timer 23H-59M-59S
Clock & Alarm
Compatible with Electro magnetic induction
1 AAA battery
In French Cooking Blister pack
₹4,850
Out of stock
Instruction:-
Connect test probe to thermometer. Open battery cover. Install battery with
correct polarity positioning. Peel off display protective sheet. If the thermometer is not in use then press [ON/OFF] button on the back to switch it off to save
battery life but the clock and timer will still function. Press [?C/?F] button on the back to select temperature unit.
CLOCK SETTING
Press [CLOCK/TIMER] to select clock mode. Press and hold [CLOCK/TIMER] button until the display flashing. Press [HR] and [MIN] to set the correct hour and minute. Holding down [HR] or [MIN] will increase the value automatically. Press
[CLOCK/TIMER] to finish setting. Press [12/24] button on the back to select 12 or
24 hours format.
TIMER OPERATION
Press [CLOCK/TIMER] to select timer mode. Press [HR] and [MIN] to set the desired
cooking time. Holding down [HR] or [MIN] will increase the value automatically.
Press [START/STOP] to start count down. The timer will sound when the values
become 0:00 00 and will be counting up to indicate the elapsed time. Press [START/STOP] to stop timer and the memorized set values will be displayed. Press [HR] and [MIN] simultaneously to clear display values.
TEMPERATURE MEASUREMENT
Insert test probe into the core of food that will be cooked and follow below instructions to access alarm function.
TEMPERATURE ALARM SETTING
Press [UP] or [DOWN] to set your desired high limit. Holding down the buttons will increase the setting value automatically. If the temperature reading is higher than the set value then the alarm will sound. Press [ON/OFF] button to switch the alarm off or on.
Based on 0 reviews
Only logged in customers who have purchased this product may leave a review.
General Enquiries
There are no enquiries yet.


There are no reviews yet.